-
-
The Lawson Labs, Inc. Model 201 24-Bit Data Acquisition
System is a high-resolution device for translating voltages
into digital form. The Model 201 communicates with a host
computer over an optically isolated RS-232 serial link. It has
6 multiplexed differential analog input channels with
provision for expansion to a total of 96 channels. There are
eight programmable gain ranges. Twenty digital input/output
lines are available for general purpose use. Future
expandability is provided through stacking option cards.
The Model 201 is intended for DC and low frequency
applications. The data rate is programmable from under 1 to
over 300 samples/second. At a data rate of one sample/second,
the RMS noise approaches two counts, providing 23 bits
effective resolution. (The converter is guaranteed monotonic
to 24 bits.) Effective resolution decreases with increasing
data rates. Even so, 16-bit effective resolution is maintained
to over 250 samples/second.
The Model 201 requires a single DC supply in the range of
11.5 to 50 volts. Current draw is typically 18 milliamps in
normal operation and only 2 milliamps in "sleep" mode. The
power and analog inputs are protected against substantial
overvoltages. These features, (plus error checking on the
serial link), make the Model 201 well suited for battery
powered remote operation.
Both polled and scanning modes are available. In scanning
mode, the Model 201 maintains it's own time base and transmits
a pre-defined scan of up to 96 input channels at a preset
interval. Scanning rates from under 1 per day to over 300 per
second are supported. Other features under software control
include self-calibration, variable input filtration, and
bipolar or unipolar input ranges.
The exceptional resolution, stability, flexibility and
price are achieved by combining an accurate, but complex,
delta-sigma type A/D converter with a microcontroller
supervisor. The microcontroller makes it simple for the user
to enjoy the power of the delta-sigma converter by issuing
straight-forward commands over a standard serial interface.
|
-
-
The Model 201 interconnections consist of three cable
connectors, a 32-pin expansion connector, and a 2-terminal
power connector. Locate the cable connectors at the bottom of
the card. They are for, from left to right, analog input,
serial input/output, and digital input/output.
NOTE: Always handle circuit cards by the edges. Static
electricity can damage computer circuitry, so care
should be taken to control static discharge.
For operational checks, only the power supply and serial
cable need be connected. The power supply voltage can range
from 11.5 to 50 VDC and does not need to be regulated. Power
is connected to the terminals on the orange terminal block.
The power terminals are labeled "+" and "-". The wall-mounted
transformer supplied has a white stripe on the positive wire.
A battery, or other DC supply (in the 11.5 to 50 VDC range)
can be substituted. The board is protected against reverse
voltage but will not operate without a properly connected
supply. The Model 201 is well suited for battery power. In the
sleep mode only 2 mA is required.
A supply voltage of greater than 24 VDC will increase
current consumption by as much as 3 milliamps. (The power can
be connected before or after the serial interface connection
is made.)
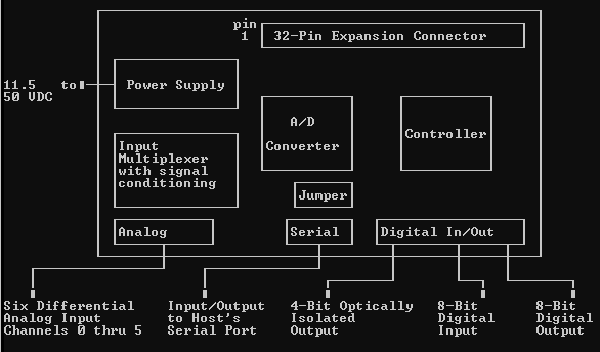
Figure 1 (further down this page) shows the input and
output connectors. The 4-bit optically isolated output allows use of
Model 17, 20, and 35 multiplexers and multiplexed amplifiers. The pinout
for the expansion connector is given in Appendix 1.
The serial interface uses a 9-pin connector and is
optically isolated from the host computer. The isolation
protects the host computer in the event of extreme
overvoltage. Note that the computer chassis ground is not
connected to ground at the Model 201. The serial pinout is
defined in Table 1.
You will need to make the necessary connections for either
a 9- or 25-pin serial port (9-pin to 25-pin adapters may be
useful). Note that pins 2 and 3 are swapped in the cable for
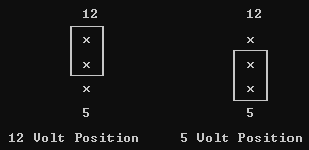
25-pin serial ports. Some portable computers have 5 volt RS232
serial ports instead of 12 volt ports. If your computer has a
5 volt serial port you will want to move the jumper by the
serial connector (see Figure 2) to the 5 volt position.
For maximum accuracy the board should be enclosed in a
shielded box. Open cell foam should be placed firmly against
both sides of the board to minimize air currents. Although a
copper/solder junction is not considered a good thermocouple,
there are many such junctions and they will have an effect at
the nanovolt level. (With a gain of 64, each count represents
9 nanovolts).
|
Establishing Communications
|
FIGURE 1:
MODEL 201 BLOCK DIAGRAM
-
-
TABLE 1:
SERIAL CONNECTOR PINOUT
-
-
|
Description
|
Model 201 Pin Number
|
Computer Serial Port Pin Number
|
|
9 pin
|
25 pin
|
|
|
TX
|
2
|
|
|
RX
|
3
|
|
|
DTR
|
4
|
|
|
GND
|
5
|
|
|
RTS
|
7
|
|
|
|
FIGURE 2:
SERIAL PORT VOLTAGE JUMPER POSITION
-
-
-
-
The software provided includes sample applications
as well as developers source code for various formats and programming
languages including QuickBASIC, VisualBasic, VisualC++, and LabView. All
except the QuickBASIC requires the use of the DLL accompanied within the
downloadable archives.
Below is an example of using the QuickBASIC sample application
to give an example of establishing communications
First make a backup copy of the support disk. You may want
to make a directory on your hard drive and copy the support
files into the directory. Your disk contains the following
files:
-
-
Put In BASIC directory:
|
DRIVR201.EXE
|
Executable driver software
|
|
DRIVR201.CFG
|
Configuration file
|
|
DEMO201.BAS
|
BASIC source code for polled mode demonstration
|
|
SCAN201.BAS
|
BASIC source code for scanning demonstration
|
|
SCRIPT.EXE
|
Executable file to generate sign-on scripts
|
|
README.SCR
|
Instructions for SCRIPT.EXE
|
WIN201 directory:
See the readme file in WIN201 for a description of the
Windows drivers and DLL.
Set the directory containing your support files as the
current directory. Type DRIVR201 from the DOS prompt. You
should see the communications menu on the screen.
Once all of the above is in order,
pressing the "1" key successively, cycles the baud rate
from 9600 through 300. The "2" key toggles the host COM port
between COM1 and COM2. By pressing the "3" key the user can
enter a buffer size between 1 and 32767 bytes. 512 bytes is
more than adequate for polled mode. A larger buffer may be
needed for scanning mode. Selecting option 4 begins a
reliability check for the serial communication link. The host
transmits characters which are echoed back by the Model 201.
The number of characters sent and the number of errors will
appear on the screen. If an error occurs a beep will sound.
When you are satisfied that communications are intact, press
"space" to continue.
If occasional serial errors are detected, select a slower
baud rate. If you get a "can't wake" message, double check the
power connections and serial cable pinout.
|
Polled Mode Overview
Using QuickBASIC sample application (for overview of functionality)
|
-
-
Once communications have been set up, the user can sign on
to the 201 by pressing the Enter key. After establishing
communications you will see the Polled Acquisition Screen.
Conversion results from the selected A/D channel will scroll
down the screen. The left hand number is the raw count from
the A/D converter. It will be a number between 0 and
16,777,215. The next number is the count translated into
volts. Next is the difference between the highest and lowest
reading. The next number is effective RMS resolution in bits.
The effective resolution is based on the last 20 conversions.
The last two numbers are the A/D channel selected and the
isolated external code selected. Commands specific to this
screen are listed at the bottom. Prompts, and responses to
commands are displayed to the right of the command line.
Bipolar or unipolar mode is indicated by a "+/-" or "+" with
the current gain setting in the upper right hand corner.
Pressing space resets the maximum and minimum readings.
Pressing the M key will display the command Menu, a summary of
commands. Enter brings back the polled acquisition Screen.
Commands can be issued from either the command menu or the
polled acquisition screen. If you are ever uncertain of the
current set-up, enter M to see the command menu screen.
|
Software Calibration
Using QuickBASIC sample application (for overview of functionality)
|
-
-
At installation the standard values will have been
retrieved from the configuration file provided. To verify
function, press "C" and select A/D input Channel "7". Channel
7 is a dedicated zero channel. You should see a voltage in the
general vicinity of zero. Enter "O" to initiate an Offset
calibration. After the offset calibration the voltage should
read very close to zero. This offset calibration removes
errors caused by the input signal conditioning circuitry as
well as offset errors in the A/D converter itself. Confirm
that the reading is close to zero volts. Press "C" and select
A/D Channel "6". This channel is a dedicated full-scale
channel. Enter "F" to initiate a Full-scale calibration. After
the full-scale calibration the converter should read very
close to +5 volts. The full-scale calibration also removes
signal conditioning errors.
The "S" command (System calibration) performs the same
sequence automatically. It does the channel selection and both
calibrations and then reselects the original channel. Settling
times are accounted for. The "FILTER DELAY" message indicates
a settling time delay.
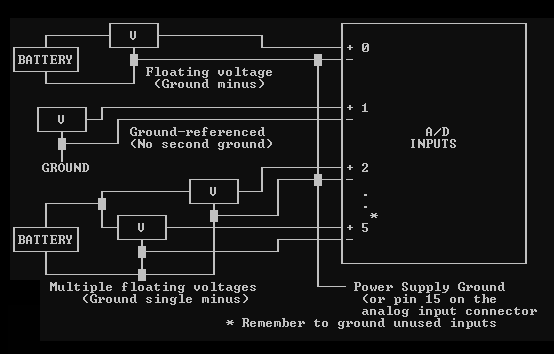
Now you are ready to connect an input signal to one of the
A/D input channels.
A battery is a convenient voltage source for checking the
Model 201. Connect the positive and negative ends of the
battery to a pair of positive and negative analog input pins
on the analog input connector. (Pins 1 and 9, respectively for
channel 0). You will also need a wire from one end (normally
the negative) of the battery to ground at the Model 201 to
insure that the input voltage at both input terminals is
within 6 volts of ground. The ground at pin 15 is provided for
the purpose. This extra ground is for common-mode requirements
only, and while necessary, it is non-critical. Remember that
the Model 201 is optically isolated and is floating compared
to the computer chassis ground. Enter "C" and select the input
channel to which you have connected the battery. Note that the
reading does not stabilize until the settling time has
elapsed. A typical D cell should read about 1.5 volts. Reverse
the wires and note the polarity change. Note that the plus
sign is implicit and does not appear. Connecting the input
wires directly together will cause a potential of zero volts.
An open circuit will read unpredictably. A positive
overvoltage will read 5 volts. A negative overvoltage will
read -5 volts. Severe negative overvoltages may appear to be
positive overvoltages. The analog input channels are protected
against continuous overvoltage up to 60 volts. With the
initial settings from the provided configuration file (10 Hz
data rate) the effective resolution should be 22 bits.
Because of extreme resolution possible with the Model 201
it is necessary to carefully shield your input signals from
electrical noise. Electrical noise can be radiated through the
air and picked up by wiring and/or circuitry. It can also be
introduced via the power connections. Also, air currents can
create sufficient thermal effects to cause degradation of
effective resolution.
You can experiment now with any of the commands. You cannot
harm the Model 201 by issuing wrong commands. As long as you
do not answer Yes to the "DO YOU WANT TO SAVE YOUR
CONFIGURATION" prompt when you exit the program, you can
always restart from the last saved set-up. If no configuration
file is present, you will begin from the standard
configuration.
It is possible to set up the Model 201 in a meaningless
way, i.e. if you do an offset and a full-scale calibration on
zero volts, then any voltage will read zero. If in doubt,
press "S" for system calibration. Also, with large filters
and/or averaging, you may have to wait for the response to a
command.
|
-
-
-
FIGURE 3:
15-PIN Analog Connectory Pinout
-
|
PIN 8
|
+5V REF. OUTPUT
|
|
|
|
|
|
PIN 15
|
GROUND
|
|
PIN 7
|
REF. GROUND
|
|
|
|
|
|
PIN 14
|
CHANNEL 5-
|
|
PIN 6
|
CHANNEL 5+
|
|
|
|
|
|
PIN 13
|
CHANNEL 4-
|
|
PIN 5
|
CHANNEL 4+
|
|
|
|
|
|
PIN 12
|
CHANNEL 3-
|
|
PIN 4
|
CHANNEL 3+
|
|
|
|
|
|
PIN 11
|
CHANNEL 2-
|
|
PIN 3
|
CHANNEL 2+
|
|
|
|
|
|
PIN 10
|
CHANNEL 1-
|
|
PIN 2
|
CHANNEL 1+
|
|
|
|
|
|
PIN 9
|
CHANNEL 0-
|
|
PIN 1
|
CHANNEL 0+
|
|
|
|
|
Note: For maximum protection, any unused input terminals
should be connected to ground. This is done to protect
the circuitry from static discharges which can be of
extremely high voltage. Open inputs can also pick up
noise. Strain-relief is recommended for all permanent
wiring on the connector. Otherwise, physical stress may
cause the failure of an electrical connection. The
connector hood provided has a strain-relief clamp.
|
Digital Input/Output Commands
Using QuickBASIC sample application (for overview of functionality)
|
-
-
The "D" (Digital input) command reads an unlatched 8-bit
digital input word at pins 18 through 25 on the digital
input/output connector. The result is shown on the polled
acquisition Screen. The most recent result is also shown next
to the "D" command on the command screen.
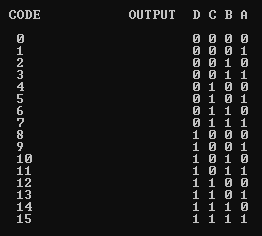
The "E" command sends a 4-bit word to the optically
isolated External control code port at pins 1 through 4 of the
digital input/output connector. The current 4-bit word is
shown on the polled acquisition screen as the external control
code (EXT). These isolated outputs can only pull down in
relation to guard (pin 5). Pin assignments for the digital
inputs and outputs are shown in Figure 4. The four optically
isolated digital outputs can be used to control Lawson Labs
Model 17, 20, and 35 multiplexers and multiplexed amplifiers.
The "U" (digital oUtput) command puts a latched 8-bit
digital word at pins 6 through 13 on the digital input/output
connector. After pressing "U", enter the word to output.
-
FIGURE 4:
25-PIN CONNECTOR PINOUT
-
|
PIN 13
|
Digital Output 7
|
|
|
|
|
|
PIN 25
|
Digital Input 7
|
|
PIN 12
|
Digital Output 6
|
|
|
|
|
|
PIN 24
|
Digital Input 6
|
|
PIN 11
|
Digital Output 5
|
|
|
|
|
|
PIN 23
|
Digital Input 5
|
|
PIN 10
|
Digital Output 4
|
|
|
|
|
|
PIN 22
|
Digital Input 4
|
|
PIN 9
|
Digital Output 3
|
|
|
|
|
|
PIN 21
|
Digital Input 3
|
|
PIN 8
|
Digital Output 2
|
|
|
|
|
|
PIN 20
|
Digital Input 2
|
|
PIN 7
|
Digital Output 1
|
|
|
|
|
|
PIN 19
|
Digital Input 1
|
|
PIN 6
|
Digital Output 0
|
|
|
|
|
|
PIN 18
|
Digital Input 0
|
|
PIN 5
|
Guard
|
|
|
|
|
|
PIN 17
|
Ground
|
|
PIN 4
|
Output D
|
|
|
|
|
|
PIN 16
|
Ground
|
|
PIN 3
|
Output C
|
|
|
|
|
|
PIN 15
|
Ground
|
|
PIN 2
|
Output B
|
|
|
|
|
|
PIN 14
|
Ground
|
|
PIN 1
|
Output A
|
|
|
|
|
Note: Pins 1 through 4 are optically isolated digital
outputs. They function relative to pin 5 only.
|
Commands for Setting Up the A D Converter
Using QuickBASIC sample application (for overview of functionality)
|
-
-
G) Gain - Gains of 1,2 ... 128 can be selected. Effective
resolution is reduced at gains above x4 or x8. The voltages
shown are after the gain stage. To get voltage at the input,
divide the displayed reading by the gain.
Note: The 5 volt reference output cannot be used for full-
scale calibration at gains other than 1.
W) Word length - The word length can be reduced from 24- to
16-bits using the W command. For higher data rates, maximum
throughput can only be obtained in the 16-bit mode. No
information is lost because the effective resolution is 16
bits or less at those high data rates. Note that not all of
the decimal places on the voltage display are significant in
16-bit mode.
R) sample Rate - The A/D converter's data rate and
frequency response are set with this command. Rates from 10 to
1027 Hz are possible. There is a low-pass filter intrinsic to
the conversion process. The cut-off frequency of that filter
is the data rate times .262. For maximum effective resolution
use the lowest data rate that meets your needs.
P) biPolar/uniPolar mode - the input range can be selected
as +/- 5 volts (bipolar) or 0-5 volts (uniPolar). Nominal
resolution improves in the unipolar mode for positive signals,
but some of that improvement is lost to fixed amplitude noise
sources.
A) Average - The Model 201 will average consecutive
conversions. Press "A" and then "+" or "-" to cycle through
the choices. The number of conversions averaged must be a
power of 2, ie., 1, 2, 4, 8, 16, etc. The maximum number of
conversions to average is 32,768. Press Enter to register your
selection. The A/D data rate divided by the averaging factor
gives the number of samples transmitted per second. Note that
with high averaging values, data arrives slowly. At 10 Hz with
32768 averaging, each data point takes 54.6 minutes.
T) filTering - The Model 201 has a programmable single-pole
filter in the signal path before the A/D converter. Press "T"
to cycle through the 3 choices for the filter cutoff
frequency: 400, 40, or 4 Hz. The lower filter cutoff
frequencies remove lower frequency noise, but require longer
settling times after channel changes.
B) standBy - The standby command puts the A/D converter
into low-power mode. A/D conversions cannot be requested in
standby mode but all mode and calibration information is
retained. Issuing a "B" command a second time restores normal
operation.
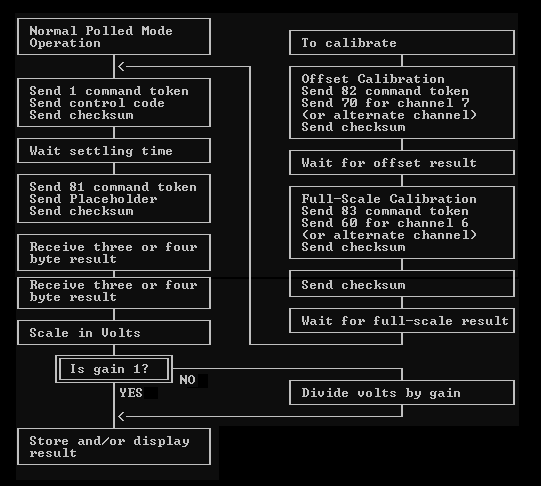
S) System calibration - The "S" command does an automated
system calibration when the gain is set to one. A/D input
channel 7 is selected and an offset calibration is performed.
Then channel 6 is selected and a full-scale calibration is
done. Finally, the original channel is re-selected.
For gains other than one, no system calibration will be
performed. A message indicating this fact will be displayed in
the lower right-hand corner of the screen. See below for a
description of how to calibrate your Model 201 for gains other
than one.
Note that the Model 201 can remove offset or gain errors
from external circuitry up to 5% of full scale. Larger offsets
can be zeroed out but a reduced input range will result. Input
voltages over 5.1 volts will be clipped to protect the A/D.
The most accurate calibration can be obtained using the
following method. Assume an amplifier is connected to A/D
input channel 0.
-
-
1. Select A/D input channel 0.
2. Apply zero volts to amplifier input. Assume the
amplifier output is +10 millivolts.
3. Do an offset calibration. Channel 0 now reads 0 volts.
4. Apply full-scale input signal to amplifier input.
Assume the amplifier output is now 4.9 volts.
5. Do a full-scale calibration. A/D channel 0 now reads 5
volts. Calibration is complete.
6. Note that now A/D input channel 7 will now read -10
millivolts and that channel 6 now will read +5 volts
overrange.
Ground and 5 volts are brought out to the analog connector
to be used for cases where the system calibration command is
not sufficient. If the gain is greater than one, the 5 volt
reference signal cannot be used for full-scale calibration.
The best full-scale calibration results will be obtained if
the actual full-scale voltage is applied to an analog input
channel before issuing a full-scale calibration command for
that channel. The 5 volt reference and reference ground on the
analog input connector facilitate the derivation of a full-
scale calibration voltage for gains other than one. For
example, a 1.25 volt reference would be required for a gain of
four. Two series resistors with a ratio of 3 to 1 will provide
one-quarter of the 5 volt reference. The total impedance of
the divider network should be in the 5K to 200K range.
|
Other commands
Using QuickBASIC sample application (for overview of functionality)
|
-
-
Z) asleep (Z)/ awake (Z) - In sleep mode the A/D and input
section is shut completely off to minimize power consumption.
The control section checks periodically for serial activity
from the host. When activity is detected, the Model 201 turns
itself on and waits for start-up information. Note that for
lowest power consumption that the analog input voltages should
be disabled.
K) checKsum - The Model 201 keeps a running total of all
serial data transmitted. The total is kept in modulo 256 form,
ie., any carry out of 8-bit binary is discarded. Therefore,
the checksum is always a number from 0 to 255. The host
computer can keep a similar total for all received words. The
host can request the Model 201's checksum any time
communications are open. The host can then compare the two
values to confirm that no serial errors have occurred. Both
checksums are set to zero after a checksum request. Checksum
OK is not a 100% guarantee that no errors have occurred
because multiple errors could cancel in the checksum. The more
frequently the checksum is requested, the smaller the chance
that a serial error will go undetected.
C) Channel - Selects one of eight A/D input channels. The
inputs are differential and should always be maintained within
6 volts of the ground of the board for proper operation. Two
of the channels are dedicated to calibration.
|
Scanning Mode
Using QuickBASIC sample application (for overview of functionality)
|
-
-
From the polled acquisition screen, a keypress of N will
take you to the scaNning menu. The scanning menu will allow
the operator to change the channel(s) to scan, scan interval,
and the type of scan. There are three types of scans
available, normal, self-calibration, and single-channel
Calibration scan adds a reading of channel 7, the offset
channel, at the end of each scan. The application then subtracts
the offset value from the other data to provide active zero-drift
supression.
Selections 0 through 5 correspond to the six A/D input
channels. With an external multiplexer connected, 1 to 96
channels can be selected for scanning. For normal and self-
calibrating scans, the A/D input channels are displayed with
the external control codes that are active for that channel.
In the single-channel mode only the selected channel will be
displayed with it's corresponding external control code. After
pressing the channel number the user will be prompted for the
external code for that channel. For multi-channel scans, both
the starting and ending external channels are entered. If the
ending channel code is below the starting code, that A/D
channel will be skipped during scanning. The single-channel
scan takes data from any one input channel.
Pressing 6 will prompt you for a new scan interval. The
minimum time is based on the baud rate, the number of readings
per scan, and the A/D speed. The A/D speed is determined by
the settings entered (press Esc then "M" to check your A/D
settings). The maximum time is determined solely by the baud
rate. The scan interval will always be an integer number of
clock counts, so the time resolution will increase with the
baud rate.
The scan type is changed by the 7 key. In normal mode, all
of the selected A/D channels are scanned during each scan
interval. The calibration scan behaves in the same way with
the exception that a system calibration is done prior to each
scan. Because no settling time is needed, the highest sampling
rates are for single-channel scans. In normal and single-
channel scans, a system calibration is performed prior to the
first scan only.
Note: The self-calibration scan is only valid for a gain of
one.
The enter key starts the scan and displays the status. The
screen will show the time the scan started, the interval time,
bytes per scan, elapsed time, scans expected, and scans
completed. Pressing the space bar will stop scanning at the
end of the current scan. Pressing Escape will cancel the
current scan. In either case, if any scans were completed,
they will be displayed next. Press space for subsequent scans.
Press Escape to return to the scanning menu.
Escape from the scan menu takes you back to polled mode.
|
TABLE 2: COMMAND SUMMARY
|
|
key
|
functionality
|
range / description
|
|
A
|
Averaging
|
1 to 32768, incremented in powers of 2, ie., 1, 2, 4, . . .
|
|
B
|
standBy
|
Toggles between standby mode and normal mode
|
|
C
|
Channel
|
Analog input chan 0 to 5; chan 6 is +5
volts reference for full scale calibration,
chan 7 is 0 volts for offset calibration
|
|
D
|
Digital input
|
Digital input reads an unlatched 8-bit digital word at pins 18
through 25 on the digital input/output connector.
|
|
E
|
External control code
|
Sends a 4-bit word to the optically isolated external control code port
|
|
F
|
Full-scale
|
Makes the selected channel read 5 volts
|
|
G
|
Gain
|
1, 2, 4, 8, 16, 32, 64, 128
|
|
K
|
checKsum
|
Requests a checksum from the Model 201
|
|
O
|
Offset calibration
|
Makes the selected channel read 0 volts
|
|
P
|
biPolar / uniPolar mode
|
the input range can be selected as +/- 5 volts (bipolar) or 0-5 volts (unipolar).
|
|
R
|
data Rate
|
10 Hz to 1 KHz
|
|
S
|
System
|
calibration automatically performs an offset and full scale calibration
|
|
T
|
filTer
|
400, 40, or 4 Hz cutoff frequency
|
|
U
|
digital oUtput
|
digital oUtput puts a latched 8-bit digital word at pins 6 through 13 on the digital input/output connector.
|
|
W
|
Word length
|
16- or 24-bit conversion result.
|
|
Z
|
asleep (Z) / awake (Z)
|
In sleep mode the A/D and input section is shut completely off to minimize power consumption.
|
|
-
-
The Model 201 A/D card features fully differential
inputs. A basic understanding of differential measurements
will help you to use your card to best advantage. The plus and
minus input pins should be wired directly to the voltage being
measured. In this way, it is assured that the only current
flowing in the wires will be the input current of the A/D
converter. Because the wires have finite resistance, any
current flowing will cause a voltage drop and a corresponding
error. The A/D card requires a vanishingly small input current
so the error caused by even very long wires is negligible. For
proper operation of the Analog Interface it is necessary that
the positive and negative inputs both be within 6 volts of
ground. For a floating voltage source, this is generally
accomplished by connecting a third wire between the Model 201
ground and a ground terminal at the source of the measured
voltage. Ground currents may flow in this wire, but the
resulting voltage drop will not cause a measurement error.
Redundant grounding can cause ground loops. Ground loops can
cause unpredictable behavior.
|
-
-
-
FIGURE 3:
TYPICAL INPUT CONNECTIONS
Best results are obtained with filtered, buffered voltages.
Electrical noise travels through the air and can be picked up
by interconnecting wires. The first defense against noise is
shielding. Use shielded wire with the shield connected at one
or both ends to ground. (See above). The lower the impedance
of the voltage source, the less susceptible the wiring will be
to electrical noise. If noise problems persist, try to locate
the source of the interference and shield it. Electric motors,
electric heaters and flickering fluorescent lights are
potential sources of interference.
|
-
-
-
TABLE 3:
EFFECT OF GAIN AND DATA RATE ON EFFECTIVE RESOLUTION
-
-
NOTE: "G" shown in table = "Gain"
|
DATA RATE
|
EFFECTIVE RESOLUTION (Bits)
|
|
|
G=1
|
G=2
|
G=4
|
G=8
|
G=16
|
G=32
|
G=64
|
G=128
|
|
10Hz
|
22
|
22.5
|
22
|
21.5
|
20
|
19.5
|
18
|
17
|
|
25Hz
|
20
|
20
|
20
|
20
|
19.5
|
18.5
|
17.5
|
16.5
|
|
50Hz
|
19.5
|
19.5
|
19.5
|
19.5
|
19
|
18.5
|
17.5
|
16.5
|
|
100Hz
|
19
|
19
|
19
|
18.5
|
18
|
17.5
|
17
|
16.5
|
|
250Hz
|
15
|
15
|
15.5
|
15.5
|
15.5
|
15.5
|
15
|
14.5
|
|
|
* Effective resolution is defined as total resolution minus
RMS noise.
-
TABLE 4:
APPROXIMATE SETTLING TIMES
-
-
|
|
SETTLING TIME: ( seconds )
|
|
Effective Resolution (bits)
|
Filter Cutoff setting of 400Hz
|
Filter Cutoff setting of 40Hz
|
Filter Cutoff setting of 4Hz
|
|
16
|
.030
|
.30
|
3.0
|
|
20
|
.035
|
.35
|
3.5
|
|
24
|
.043
|
.43
|
4.3
|
|
|
Note: For maximum accuracy, wait twice the theoretic settling times.
|
Digital Input and Output
Using QuickBASIC sample application (for overview of functionality)
|
-
-
The digital input lines will accept signals from TTL or 5
volt CMOS logic. They will also work with contact closures to
ground. Inactive input pins are pulled up to 5 volts by 100K
resistors. The input voltage should not go above 5 volts or
below ground.
The 8-bit digital output word is also 5 volt CMOS logic.
Each output can source or sink several milliamps.
The optically isolated output port is primarily intended
for controlling external input multiplexers and multiplexed
amplifiers.
FIGURE 6:
OPTICALLY ISOLATED DIGITAL OUTPUT CODES
-
-
Electrically, each output line is the collector of an
optically coupled NPN transistor whose emitter is connected to
guard. Note that guard is not connected to ground on the Model
201. The guard is usually connected to the external device's
ground. Each output line can drive two low-power TTL loads or
many CMOS loads. An external pull-up resistor (from the
collector to the external positive supply) must be used.
Typically, 20 K ohms for low-power TTL or 47 K ohms for CMOS
is appropriate (the external supply can be as high as 24 VDC).
When the output code is 0, all four phototransistors are off
and no current is drawn through the transistors. If the input
to an inverting buffer is connected to output line A (with the
appropriate pull-up resistor), the input level is forced high
by the resistor so the buffer output would be 0. If the output
code is 1, the A transistor will turn on and pull the buffer
input to a logic level 0. The buffer output will then be a
logic level 1.
|
|